Education plugin for Orthanc
Contents
The Education plugin turns Orthanc into a tool for sharing medical images with students for educational purposes. The plugin also supports the LTI 1.3 protocol, allowing integration with Learning Management Systems such as Moodle.
The images can be displayed using the Web viewers that are integrated as plugins for Orthanc (i.e., Stone Web viewer, OHIF, and Kitware VolView). The plugin also includes support for virtual microscopy: It facilitates the DICOM-ization of whole-slide images and offers a Web-based viewer through an intuitive interface to the whole-slide imaging primitives of Orthanc.
The Education plugin requires the version of Orthanc to be above or equal to 1.12.9. It is released under the AGPL license. Note that this plugin overwrites the way users are authenticated by Orthanc.
Acknowledgments:
This development was partially funded by the Virtual Hospital grant at Louvain School of Engineering (EPL).
The initial exploration of the LTI protocol for Orthanc was carried out in Python as part of Florentin Botton’s master’s thesis at EPL, under the supervision of Sébastien Jodogne and entitled “Medical Imaging Education and Learning Management Systems.”
Overview
The Orthanc plugin supports two modes of operation. The standalone mode allows Orthanc to operate as a Web server for sharing collections of medical images with learners. In this mode, instructors can provide learners with a URL linking to a Web page that lists the images in the collection, allowing them to view the images using their preferred Web viewer. The following screenshot shows this page:

The second mode of operation integrates Orthanc with a Learning Management System (LMS), such as Moodle. This integration is implemented according to the LTI protocol 1.3. Click on the following image to view a demo video:
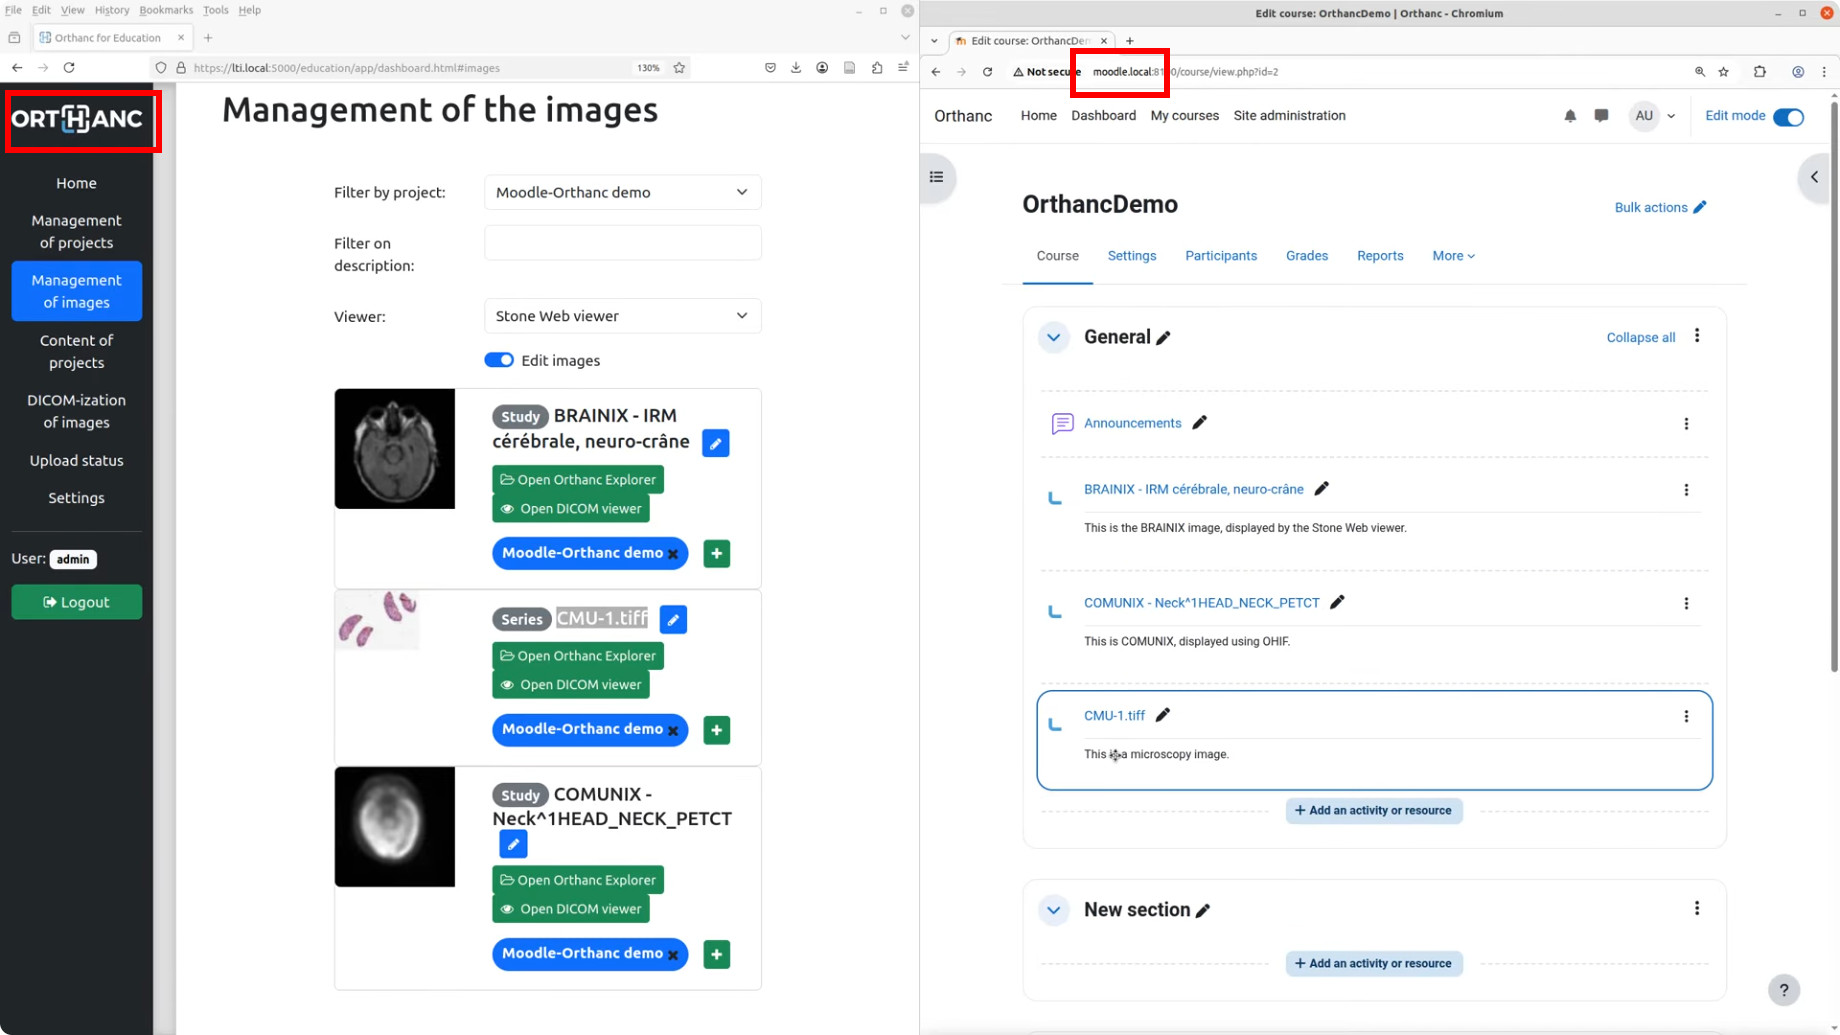
In this video, the left portion of the screen presents the administrative interface of the Education plugin, used to associate medical images with collections of images (those collections are referred to as “projects”). The right portion displays the Moodle user interface, enabling learners to access the images and open Web viewers managed by Orthanc. Contrarily to the standalone mode,
Both modes of operation include a permission system ensuring that learners can only view images they are authorized to access. Additionally, the Education plugin supports multiple collections, which can be associated with different instructors.
Compilation
Official releases of the plugin can be downloaded from the Orthanc homepage. As an alternative, the repository containing the source code can be accessed using Mercurial.
The procedure to compile this plugin is similar of that for the core of Orthanc. The following commands should work on most GNU/Linux distributions:
$ mkdir Build
$ cd Build
$ cmake .. -DSTATIC_BUILD=ON -DCMAKE_BUILD_TYPE=Release
$ make
The compilation will produce a shared library
libOrthancEducation.so that contains the Education plugin for
Orthanc.
Pre-compiled Linux Standard Base (LSB) binaries are available for download. Pre-compiled binaries for Microsoft Windows and macOS are available as well.
Furthermore, the Docker images
jodogne/orthanc-plugins and orthancteam/orthanc also contain the
plugin. Debian and Ubuntu packages can be found in the
standalone repository
https://orthanc.uclouvain.be/debian/.
Usage
This section introduces the various concepts that are necessary to understand how the Education plugin for Orthanc works.
User management
The Education plugin for Orthanc makes the distinction between 3 categories of users:
Administrators are responsible for the configuration of Orthanc and for the management of the collections of medical images (referred to as “projects”). It is up to the administrators to upload the DICOM resources, to create the projects, to dispatch the images among the different projects, and to associate projects with instructors and learners. To this end, administrators have full access to the administrative interface of the Education plugin, to the configuration of all of the projects, as well as to both Orthanc Explorer and Orthanc Explorer 2.
Standard users represent either instructors or learners. These users cannot modify the configuration of the platform, upload medical images, or distribute images across projects. Instructors can modify project-specific settings based on their pedagogical objectives, such as controlling project visibility or selecting which viewers are available for a given project. A user may act as an instructor in certain projects and as a learner in others. For this reason, the “teacher vs. student” terminology is avoided, as it implies a fixed role for each user.
Guest users are users who are not authenticated by the platform. They behave like learners but can only access projects with public visibility. This functionality can be used to publish massive open online courses (MOOCs) in the standalone mode of operation.
User authentication
The way the Education plugin authenticates administrators and standard users is specified in the configuration file of Orthanc. The authentication process for administrators can differ from the one used for standard users. As of release 1.0 of the Education plugin, the following authentication mechanisms are available:
Login. In this case, the Education plugin displays a login page where the user can enter their credentials, which are specified in the configuration file. Internally, after a successful login, user information is stored as a JWT session cookie named
orthanc-education-user.HTTP headers. In this case, the user identity is determined by the presence of a specific HTTP header, specified in the
AuthenticationHttpHeaderconfiguration option. This approach can be used in the standalone mode of operation, when single sign-on (SSO) is implemented within an institution. At UCLouvain, this authentication mode has been validated with Shibboleth in combination with thelibapache2-mod-shibmodule, with Apache acting as a reverse proxy. Two options are available for header-based authentication:Unrestricted: If the specified HTTP header is present, the user is authenticated immediately, and the header value is interpreted as the user identifier.
Restricted: A user is authenticated only if the HTTP header value matches one of the allowed entries defined in the configuration. This option can be used to grant administrator-level access to a specific subset of users.
None. In this mode, the login page is displayed, but no user can log in. This can be used to disable administrator-level access in order to freeze the platform configuration, or to prevent standard users from logging in when LTI-based authentication is available.
LTI-based authentication. This authentication mechanism is automatically activated when LTI support is enabled for integration with a Learning Management System (LMS), such as Moodle. Authentication is then handled through OIDC-based authentication initiated by the LTI platform. The mechanism grants instructor or learner access to a single project, corresponding to the deep link from which the request originates. The role (instructor or learner) is determined by the value of the
https://purl.imsglobal.org/spec/lti/claim/rolesfield, and the user identifier is derived from the e-mail address provided by the LTI platform. Upon successful authentication, user information is stored in a JWT session cookie namedorthanc-education-lti.
Note that if both the orthanc-education-user and
orthanc-education-lti cookies are present, login-based
authentication takes precedence, since LTI-based authentication
provides more limited access.
Projects
A project is defined as a collection of DICOM resources. These resources can be studies, series, or instances. The same DICOM resource can be shared by multiple projects. Projects are created and managed by administrators. A project is defined by the following parameters:
The list of instructors specifies the standard users who are permitted to change the project configuration and to review its stored images before the project is published to the learners.
The list of learners specifies which standard users are allowed to view the medical images in the collection. In standalone mode, learners can choose from a pre-selected set of Web viewers, as defined by the project instructors.
The access policy determines which standard users or guest users are permitted to access the DICOM resources linked to a project. Three policies are available:
Hidden: The project is accessible only to its instructors and to the platform administrators. This allows instructors to prepare course material before granting students access to the medical images (for example, when setting up examinations).
Active: The project becomes accessible to the specified list of learners. Guest users cannot access the collection.
Public: The project is accessible to any standard user, as well as to any guest user. This policy can be used in the context of MOOCs.
The primary viewer is the default Web viewer for the project, whose usage is recommended to learners by the project instructors. As of release 1.0, the following viewers are recognized by the Education plugin: Stone Web viewer, OHIF, Kitware VolView, and Whole-slide imaging.
The secondary viewers are a list of additional viewers that may be useful to learners alongside the primary viewer.
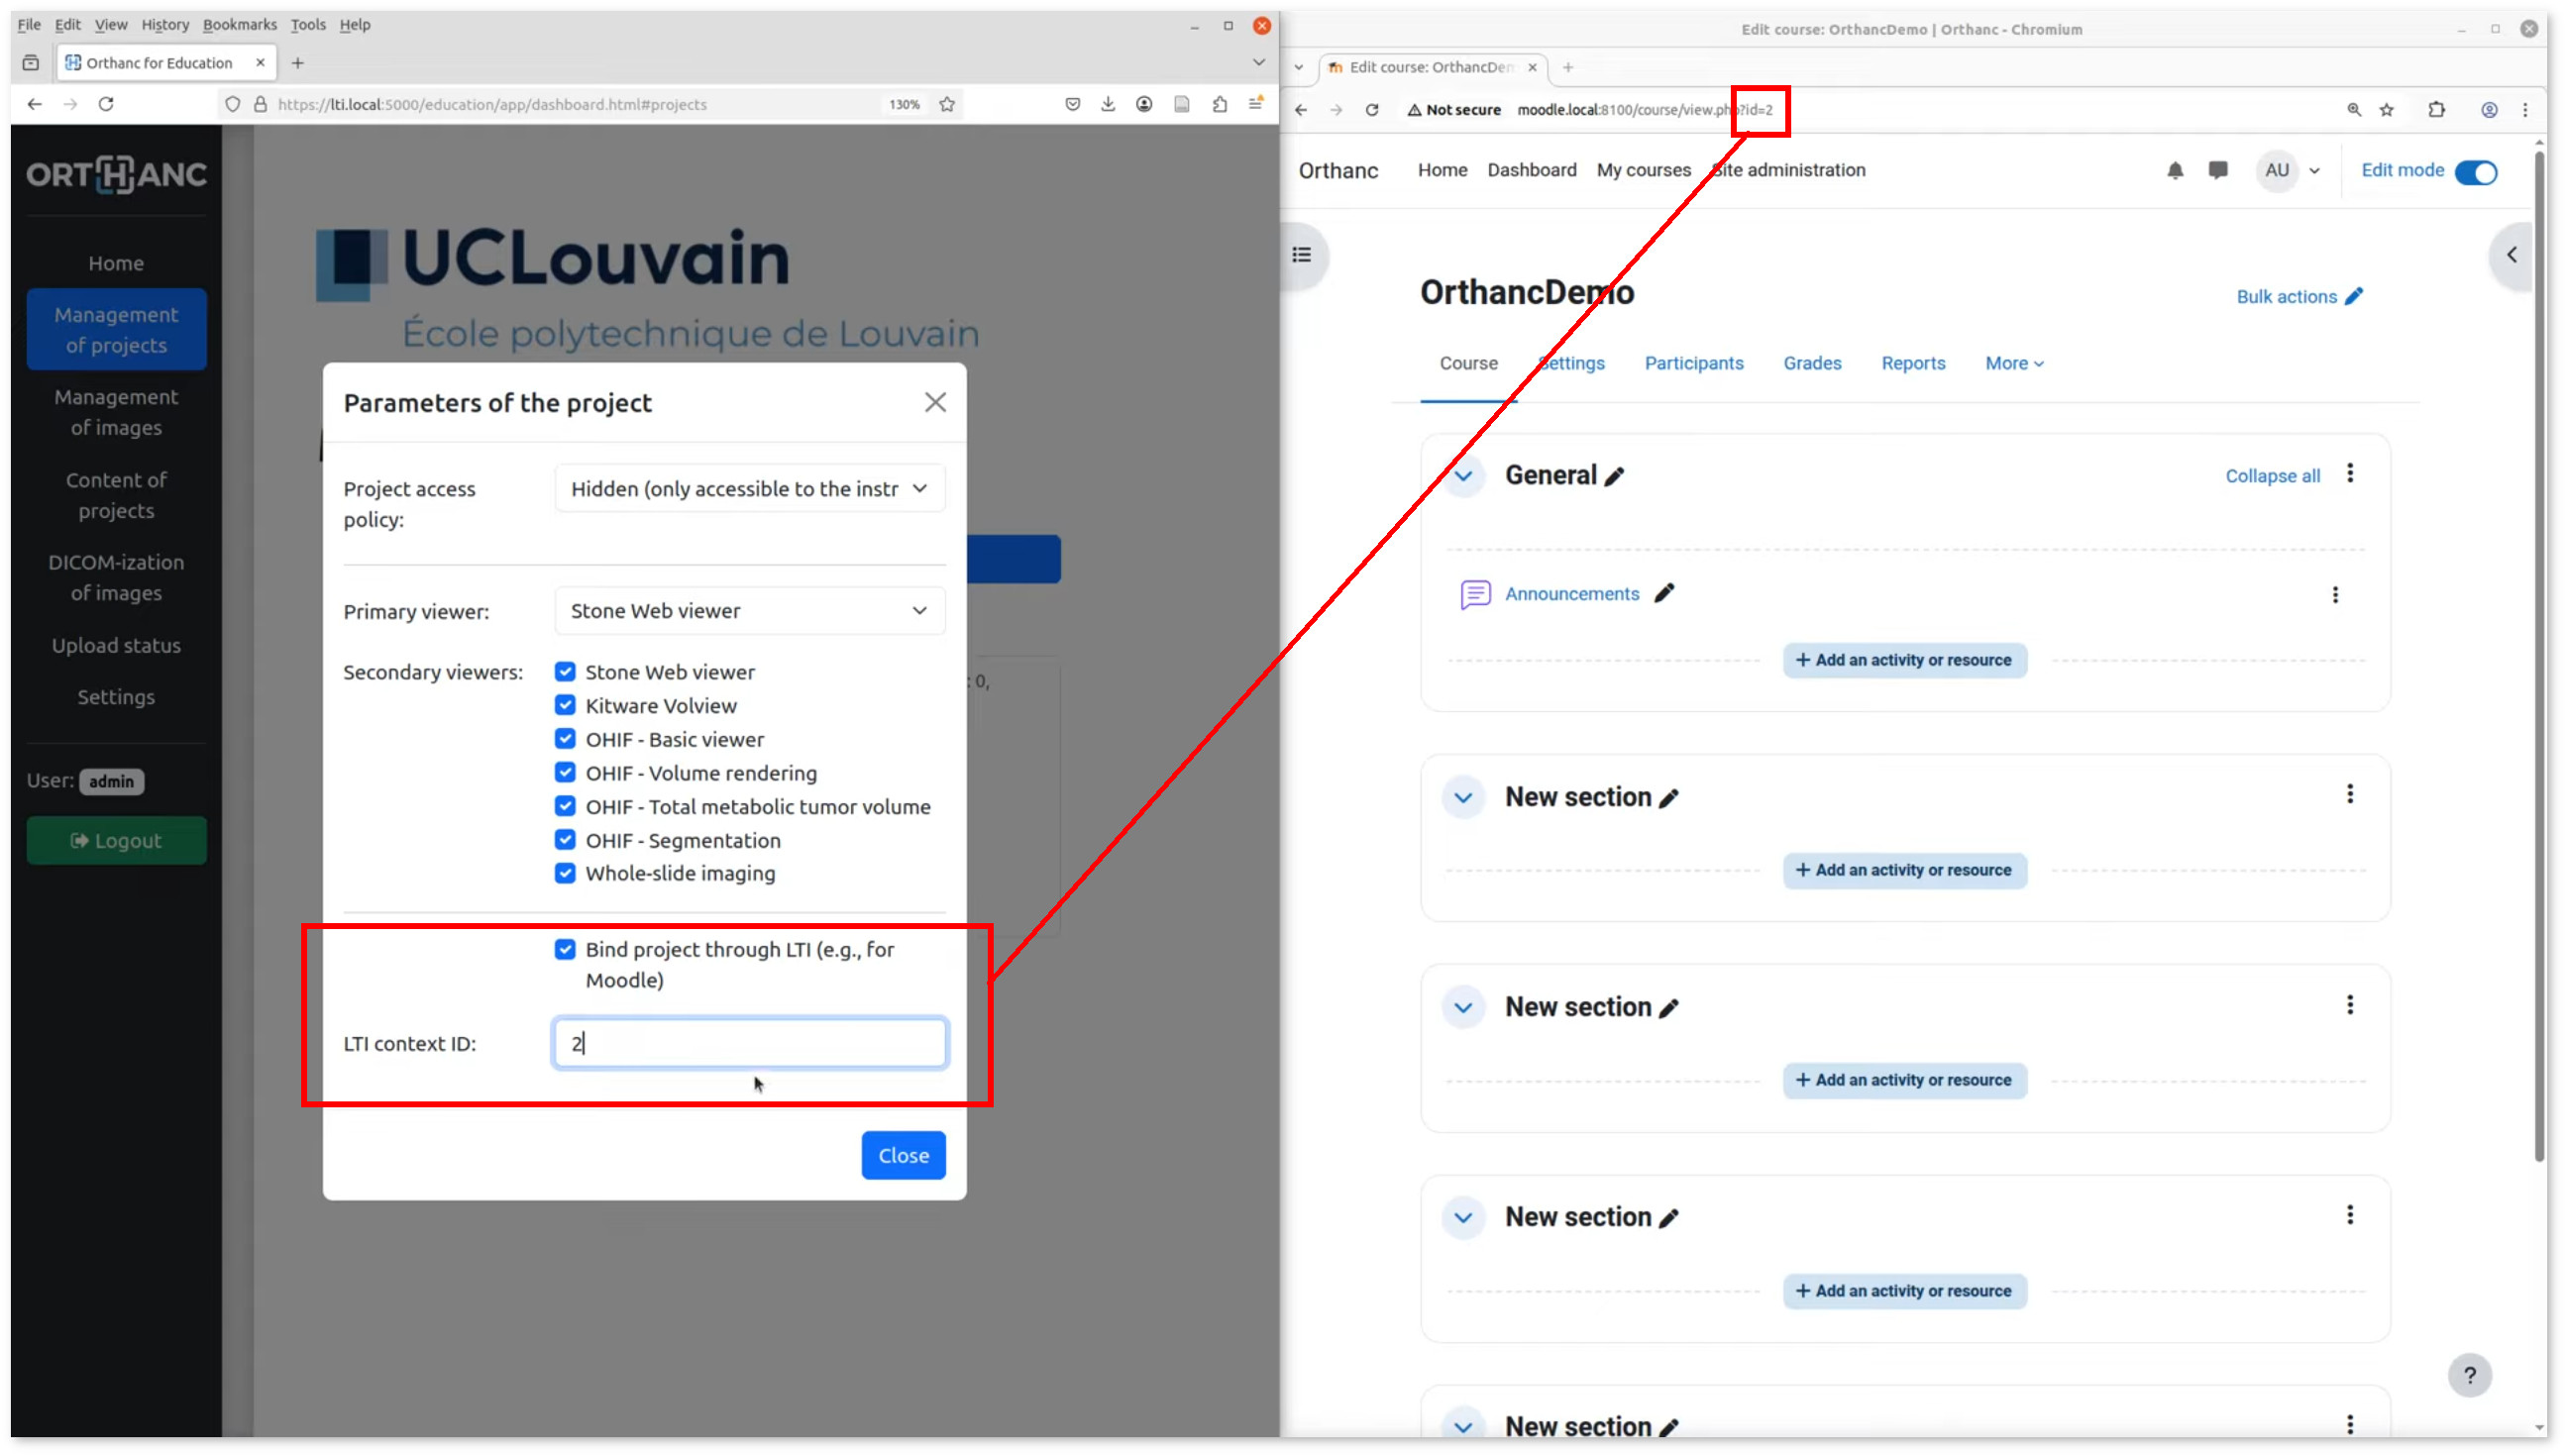
LTI context ID: When the Education plugin is used with a Learning Management System (LMS) such as Moodle, this parameter specifies the identifier of the course in the LTI platform. Deep links in the LMS course can only be created to the project whose LTI context ID matches this course.
Here is a screenshot of how projects can be configured in the administrative interface of the Education plugin:

The individual parameters of a project look as follows:

Collection of images
The Education plugin offers an administrative interface for linking DICOM resources to the collection of medical images associated with each project:

Various filters are available to help identify DICOM resources that are not yet assigned to any project. The association of DICOM studies, series, and instances to projects is implemented internally using the labels feature of Orthanc.
The content of individual projects can be inspected as well:

Besides allowing access to the medical images in the collection, this page provides three important pieces of information highlighted in red:
The Orthanc label that is used to associate DICOM resources with the project. Consequently, as an alternative to the built-in administrative interface of the Education plugin, Orthanc Explorer or Orthanc Explorer 2 can be used to link or unlink images with the project by manually editing the labels of the DICOM resources of interest. Note that the built-in interface only supports the association of studies and series. If you need to link a DICOM instance to a project, you must manually edit the labels.
The URL to access the content of the project by instructors, learners, or guest users (if the project is public).
An edit box is provided to facilitate adding an image to the project while it is being reviewed in one of the Web viewers supported by Orthanc. To do so, simply paste the URL of the viewer. This necessitates the
PublicRootsconfiguration option to include the base URL of the Orthanc instance.
Access to learners
After authentication, non-administrator users are redirected to a Web page giving access to all projects for which they appear on the list of learners:

Guest users also have access to this page, but only see the projects with a public access policy.
If the authenticated standard user is also an instructor of the project, this user can modify some parameters of the project (i.e., its access policy, its primary viewer, and its list of secondary viewers).
By default, this page lists all the projects that are available to the
user. This behavior can be disabled by setting the configuration
option ListProjectsAsLearner to false. In this case, the
instructor will have share the URL tagged as “Access by instructors
and learners” in the page listing the content of the project.
Virtual microscope
An important use case of the Education plugin for Orthanc is to provide a virtual microscope for teaching histology and digital pathology. This use case takes advantage of the whole-slide imaging support implemented by the Orthanc project. DICOM-ization is accessible from the administrative interface of the Education plugin:

This interface is only accessible if the
WholeSlideImagingDicomizer configuration option contains the path
to the OrthancWSIDicomizer command-line tool from the
whole-slide imaging framework of Orthanc. Once the upload
is done, the page named “Upload status” provides the status of the
DICOM-ization, including the logs of the command-line tool.
Some proprietary formats (such as MRXS or NDPI) requires the
DICOM-ization command-line tool to use the OpenSlide library. In this case, the OpenSlideLibrary
configuration option must contain the path to the openslide.so
(GNU/Linux) or openslide.dll (Microsoft Windows) shared library.
To associate a DICOM-ized whole-slide image with a project, make sure to associate the DICOM series in the content of the project (not the DICOM study). Indeed, the whole-slide imaging viewer only works at the instance or series level.
Note that future releases may include DICOM-ization of additional types of images (e.g., 3D models, PNG or JPEG images,…).
Configuration file
Generic configuration
To enable the Education plugin, the configuration file must contain a specific section named Education:
{
  "Plugins" : [
    "${HOME}/Downloads/libOrthancEducation.so"
  ],
  "Education" : {
    /* Generic options */
    "Enabled" : true,
    "PublicRoots" : [
      "http://localhost:8042"  /* Public base URL where the Orthanc Web server is mapped */
    ],
    "ListProjectsAsLearner" : true,

    /* Options for the virtual microscope */
    "WholeSlideImagingDicomizer" : "${HOME}/Downloads/OrthancWSIDicomizer",
    "OpenSlideLibrary" : "libopenslide.so",

    /* ...other options... */
  }
}
If you want to use Orthanc Explorer 2 together with the Education plugin, make sure to disable its default behavior that sets it as the default Web interface of Orthanc:
{
  /* ... */
  "OrthancExplorer2" : {
    "IsDefaultOrthancUI": false
   }
}
Login-based deployments
Here is a possible configuration for a standalone deployment of the Education plugin using a login page:
{
  /* ... */
  "Education" : {
    /* ... */
    "AuthenticationHttpHeader" : "Mail",
    "Administrators" : {
      "Authentication" : "Login",
      "Credentials" : {
        "admin" : "pass1"
      }
    },
    "StandardUsers" : {
      "Authentication" : "Login",
      "Credentials" : {
        "instructor" : "pass2",
        "learner" : "pass3"
      }
    }
  }
}
This configuration defines one administrator (whose identifier is
admin) and two standard users (with identifiers instructor and
learner). Because their passwords are hard-coded, the
configuration file must not be publicly accessible.
All the requests requiring an authentication will be redirected to the login page. The page with the list of projects for learners is reachable without login, allowing guest users to access public projects (e.g., in the context of MOOCs).
Deployments with HTTP headers (SSO)
Here is a possible configuration for a standalone deployment of the Education plugin behind a single sign-on (SSO) infrastructure:
{
  /* ... */
  "Education" : {
    /* ... */
    "Administrators" : {
      "Authentication" : "RestrictedHttpHeader",
      "RestrictedHeaders" : [
        "admin@uclouvain.be"
      ]
    },
    "StandardUsers" : {
      "Authentication" : "RestrictedHttpHeader",
      "RestrictedHeaders" : [
        "instructor@uclouvain.be",
        "learner@uclouvain.be"
      ]
    }
  }
}
This configuration authenticates administrators and standard users
based on the presence of the Mail HTTP header, which must be set
by the SSO infrastructure. In this example, there is one administrator
(admin@uclouvain.be) and two standard users
(instructor@uclouvain.be and learner@uclouvain.be). If the
Mail header matches none of those e-mails, the authentication
results in the guest user.
Evidently, you can emulate a SSO infrastructure by putting a reverse
proxy (e.g., nginx or Apache) in front
of Orthanc, asking the reverse proxy to automatically set some HTTP
header (cf. proxy_set_header if nginx is used).
When handling large cohorts of learners, it is not practical to list
all of them in the configuration files. In this case, the
Authentication option for standard users can be set to
HttpHeader:
{
  /* ... */
  "Education" : {
    /* ... */
    "AuthenticationHttpHeader" : "Mail",
    "Administrators" : {
      "Authentication" : "RestrictedHttpHeader",
      "RestrictedHeaders" : [
        "admin@uclouvain.be"
      ]
    },
    "StandardUsers" : {
      "Authentication" : "HttpHeader"
    }
  }
}
When this option is enabled, any HTTP request containing the Mail
header is authenticated as a standard user. The value of the Mail
header defines the user identity.
LTI deployments
Here is the recommended configuration file to integrate the Education plugin with a Learning Management Systems such as Moodle:
{
  /* ... */
  "RemoteAccessAllowed" : true,
  "Education" : {
    /* ... */
    "Administrators" : {
      "Authentication" : "Login",
      "Credentials" : {
        "admin" : "pass"
      }
    },
    "StandardUsers" : {
      "Authentication" : "None"
    },
    "LTI": {
      "Enabled": true,
      "OrthancUrl" : "https://lti.local:5000",
      "PlatformUrl" : "http://moodle.local:8100"
    },
    "PublicRoots" : [
      "https://lti.local:5000"
    ]
  }
}
In this configuration, the administrator is authenticated through a
login page. Standard users are not authenticated by the mechanisms
provided by the Education plugin (hence the None value), but
instead through the primitives defined by the LTI 1.3 protocol.
In this case, Orthanc must also be explicitly provided with its own
public base URL (https://lti.local:5000) and the base URL of the
LMS (http://moodle.local:8100). This information is used to verify
the security of the bidirectional communication between Orthanc and
the LMS through the LTI protocol.
Once Orthanc is running, you can configure the LMS platform. In this section, we use Moodle as an example, as it is the only LMS that has been tested with release 1.0 of the Education plugin. The screenshots below are taken from the video illustrating the configuration steps. Open the configuration interface of external tools in Moodle:

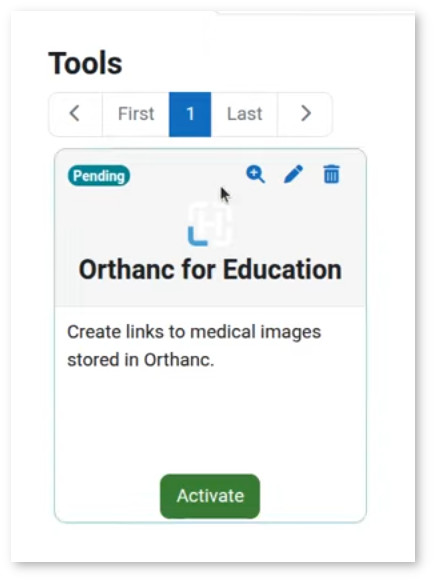
Then click on the “Add LTI Advantage” button with the
https://lti.local:5000/education/lti/register URL. Evidently, you
will have to adapt this URL with the public root of your Orthanc
server. This results in the addition of the tool:
If you edit the configuration of this newly added external tool (by clicking on the pen icon), you see all the parameters that have been automatically negotiated between Orthanc and Moodle:
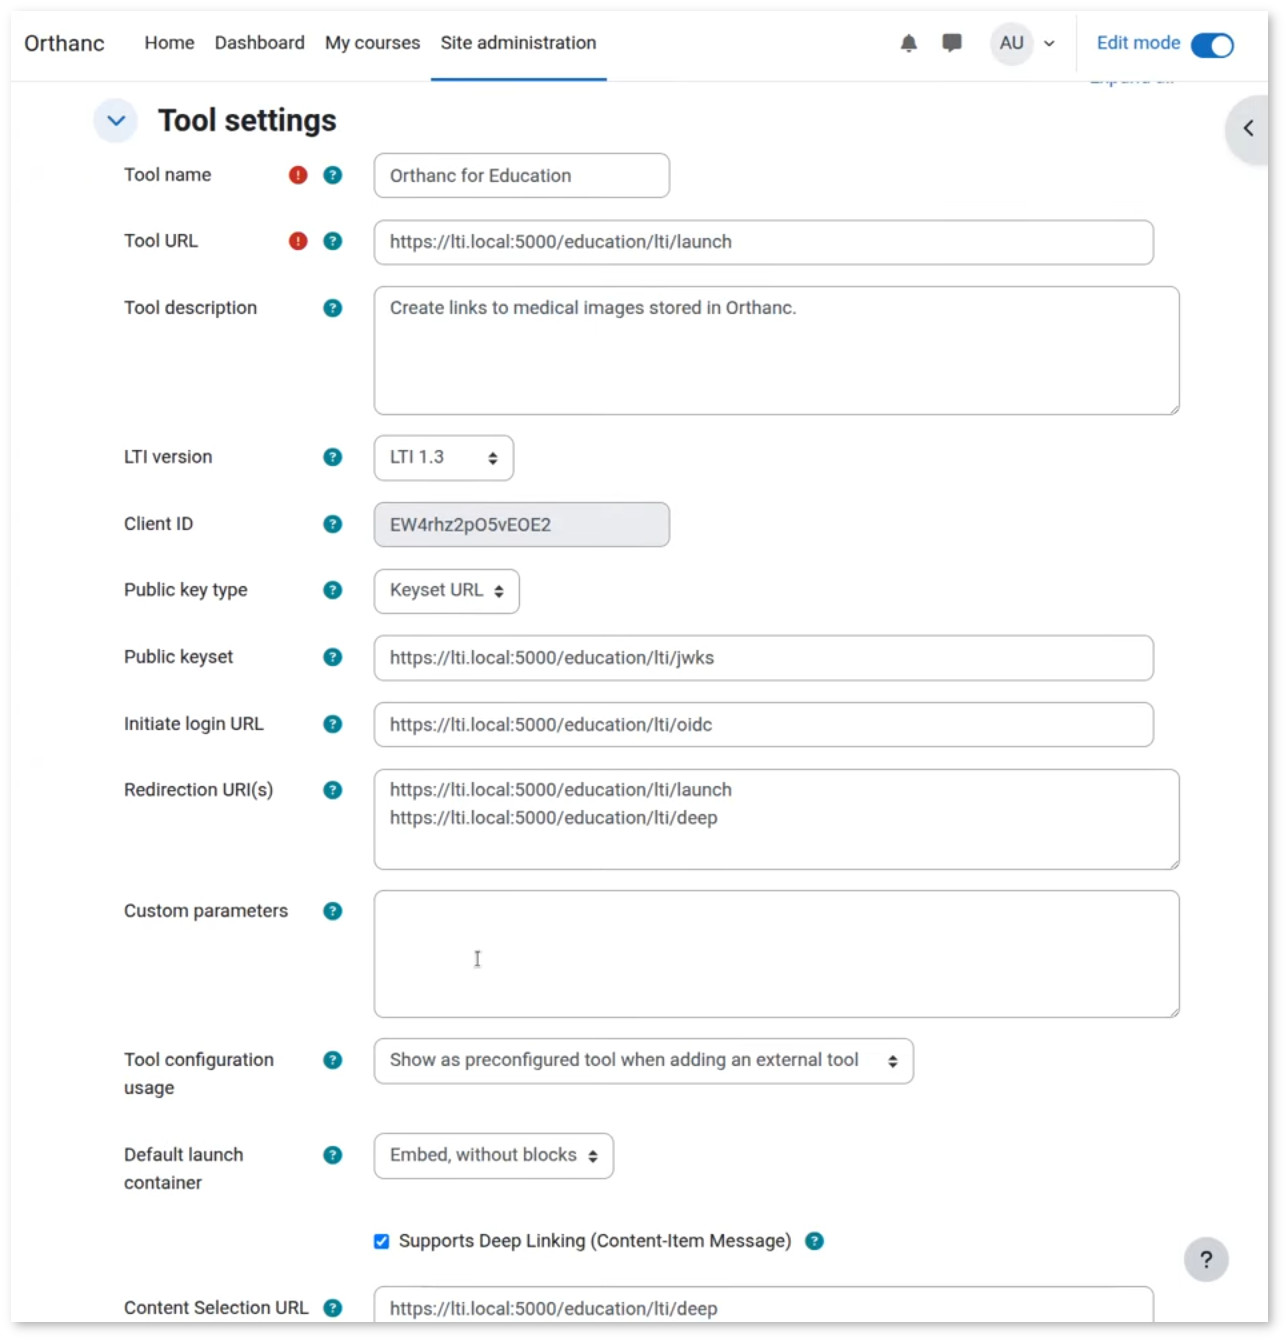
An important piece of information is the “LTI Client ID”, which should also have been filled on the “Settings” page of the administrative interface of the Education plugin in Orthanc.
For best operation, it is necessary to manually change the default values of the “Tool configuration usage” and “Default launch container” as follows:

You can then click on the “Activate” button to make the “Orthanc for Education” external tool available in the Moodle courses.
The LTI context ID for the configuration of the project can be retrieved by copying the identifier of the course from the URL of the course in Moodle:
Other options
Note that it is always recommended to enable HTTPS encryption in Orthanc for security reasons, especially for LTI deployments. Some additional security-related options are available in the Education plugin:
{
  /* ... */
  "Education" : {
    /* ... */
    "MaxLoginAge" : 3600,  /* After how many seconds login-based authentication expires */
    "SecureCookies" : true,  /* Whether cookies are tagged as "Secure", only set to "false" for debugging */
  }
}
Troubleshooting
Several problems can be encountered if using LTI integration with Moodle:
Error 400 with message
"Missing field: \"id_token\""during the creation of a deep link.Explanation: This means that the “LTI Client ID” in the settings of the Education plugin is out of sync with the Moodle configuration.
Resolution: Modify the settings in Orthanc, or reinstall the “Orthanc for Education” external from scratch.
Error 500 with message
"Unknown LTI context ID"during the creation of a deep link.Explanation: This means that the Moodle course has not been correctly associated with a project in the Orthanc Education plugin.
Resolution: Edit the project settings in Orthanc, and appropriately set the field “LTI context ID”.
Moodle shows the following error during the creation of a deep link:
"Exception - mod_lti\local\ltiopenid\jwks_helper::fix_jwks_alg(): Argument #1 ($jwks) must be of type array, null given, called in [dirroot]/mod/lti/locallib.php"Explanation: This means that the cURL library used by Moodle is not allowed to contact the Orthanc Web server, notably the route that provides the OIDC JSON web key (JWK) endpoint (in our example,
https://lti.local:5000/education/lti/jwks).Resolution:
Make sure that the domain name used by Orthanc (in our example,
lti.local) is secured by a valid HTTPS certificate, and that the HTTPS certificate is trusted by the machine running Moodle.Make sure that the security settings of Moodle (in our example, those settings are accessible at
http://moodle.local:8100/admin/settings.php?section=httpsecurity) allow to contact the TCP port on which Orthanc is listening (in our example, the port is5000, but by default it would be8042), and to contact the IP address on which Orthanc is installed.